Three-point lighting is a simple way to shape how you look on camera. It uses a key light, a fill light, and a backlight to reduce harsh shadows and add depth. This method helps your face and background appear clear, natural, and professional.
You can recreate this setup with common lights at home or in an office. The key light is the brightest. The fill softens contrast. The backlight separates you from the background.
Better lighting improves perceived quality before you touch camera settings. A cleaner image helps your webcam capture fewer extremes and makes your presence stronger in video conferencing.
This guide will cover room prep, natural versus artificial choices, color temperature basics, placement and angles, glare fixes, and gear options. You don’t need a studio — start with what you have and upgrade based on meeting frequency and space. Practical targets for angles, lumen ranges, and Kelvin values will help you repeat results quickly.
Why lighting changes how you look on video calls
How you look on screen starts with the light hitting your face—not your camera settings. Your camera compresses and auto-adjusts exposure, so light from different sources controls how skin tone, eyes, and micro-expressions appear in real time.

Even, front-biased lighting improves clarity and makes you seem more approachable. When your features are readable, you send confident nonverbal cues without saying a word. That raises perceived meeting quality and helps your message land.
- Harsh overhead lights create deep shadows under eyes and noses.
- Side-only lamps cause uneven contrast that distracts viewers.
- Bright reflections and glare can hide the eyes and reduce engagement.
Quick diagnostic: if your background is brighter than you, the camera darkens your face and you “disappear.” To avoid that, make sure your face is the brightest, cleanest-lit element in frame. Small adjustments at your desk or workspace will make your presence on conferencing platforms far more effective.
Prep your room for consistent lighting video calls
Pick one location in your home office and keep your desk, camera, and lights fixed for reliable results. A steady spot saves time and gives consistent framing for every meeting.
Why consistency matters: When your desk and light sources stay in the same place, you avoid fixing exposure and glare before each session. That means fewer surprises and a cleaner, repeatable look.

Choose a stable spot
Find a space with minimal foot traffic and room to place a small key light to the side. Position your camera at eye level and keep the desk layout steady.
Remove or angle reflective surfaces
Scan the room for mirrors, glossy frames, bright whiteboards, or shiny cabinets. These items can produce hot spots that force your camera to auto-adjust exposure.
- Move or tilt reflective items out of frame.
- Reposition the light source so reflections fall away from the camera.
- Use matte backgrounds when possible.
Avoid strong backlighting
If a window or lamp sits behind you, your face can become a silhouette. Rotate your setup so the main light comes from in front or off to the side. Then open your video preview and adjust until your face looks evenly lit and the background doesn’t compete for attention.
Natural light vs. artificial light for video conferencing
A nearby window with indirect sun can make your on-screen presence appear more natural and lively. Use natural light when it spreads evenly across your face and doesn’t create hot spots.
When natural light makes you look best
Natural light works well if you sit facing a window with soft, indirect daylight. That broad, diffuse source reduces harsh texture and helps skin tones read more naturally on camera.
Face the window rather than putting it behind you to avoid silhouettes and heavy facial shadows.
Manage inconsistent daylight with curtains and timing
Daylight shifts with weather and time, so your appearance can change mid-session. Use sheer curtains to soften direct sun and cut glare.
Schedule important meetings during the time window when the light is most steady. That simple timing trick keeps your settings consistent and reduces surprises.
When artificial lights are the better choice
When you need reliable results every day, artificial lighting wins. LEDs and desk lamps let you lock brightness and color so your camera does not hunt for exposure.
- Use one steady source as your main light.
- Match color temperature to natural daylight if you mix sources.
- Keep intensity balanced so the camera isn’t constantly compensating.
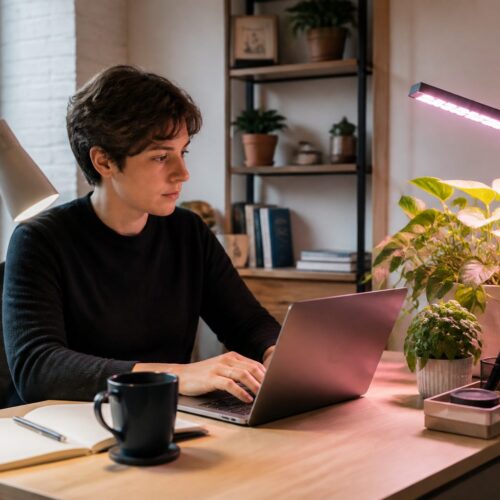
Color temperature and bulbs that look natural on camera
Choose a color balance that flatters skin and keeps your image looking natural. Color temperature is the warm-to-cool “color” of white light, measured in Kelvin, and it changes how natural you look on camera.
Aim for a target of about 5000K. That temperature mimics clean daylight and usually reads neutral and professional for most skin tones.
Warm temperatures (lower Kelvin) can drift too yellow, while cool temperatures can appear too blue and clinical. Both extremes change how tones render on-screen.
How to choose bulbs and avoid mixed lighting
- Prefer adjustable LEDs (typical range ~2700K–6500K) so you can fine-tune Kelvin and brightness.
- Set one dominant color temperature for your face and minimize competing sources in the room.
- Many ring lights and LED panels include Kelvin settings, making consistent color easier across different rooms.
Quick rule: lock the key light’s temperature first, then match other lights or turn them off to avoid uneven tones. That keeps your settings repeatable and your appearance steady.
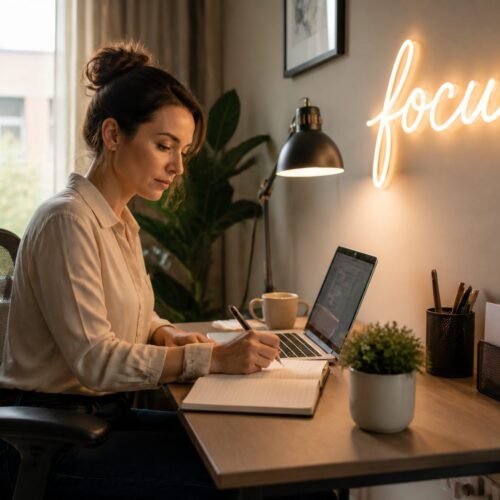
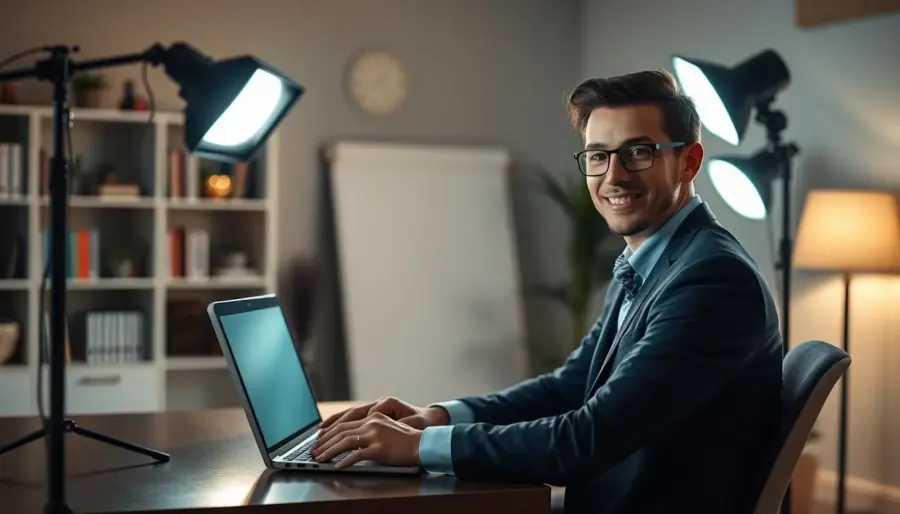
Three-point lighting basics: key light, fill light, backlight
A simple three-point scheme gives you a repeatable lighting blueprint for any workspace. Use it at a home desk or in a small conference room to make your face read clearly on camera during a video or video call.
Key placement for definition
The key light is your main light source and should be the brightest. Place it near the camera, slightly off-center, to sculpt features and reduce harsh shadows.
Fill techniques to soften contrast
The fill is dimmer and sits opposite the key. Its job is to soften shadows so your face looks natural, not flat. Use a second lamp or a desk lamp with lower output.
Backlight for depth
Place a small light behind you, a bit above shoulder height. That back source creates separation so you don’t blend into the background.
If you have two lights or one plus a reflector
- Two lights: set the brighter as key and the dimmer as fill; increase distance from background for more depth.
- One light + reflector: aim the key at you and bounce light off a white board or wall to soften shadows.
- Gear notes: a ring light can serve as an easy key; a desk lamp or lamp can substitute when you start.
Make sure the key remains dominant and the fill stays softer so your face keeps natural dimension on screen.
Video call illumination: placement, angles, and brightness that flatter
Small changes in placement and brightness are the fastest way to improve how you look on-screen. Start with a clear plan, then test in your camera preview.
Position your key light at a 45-degree angle
Place the key light about 45 degrees to one side of your camera and aim it at your face instead of a wall. This offset creates gentle shadows that add depth without distraction.
Use a brightness target: 600–800 lumens
Aim for roughly 600–800 lumens on the key light at typical webcam distance. If you look washed out, dim the source a little until skin tones read naturally.
Keep the source slightly above eye level
Raise the light so it sits a bit above your eyes. That height sculpts the cheekbones and reduces unflattering under-eye and chin shadows.
Quick adjustment loop: open your preview, move the light a few inches, and stop when skin looks even and your eyes are clear. Stable lighting helps the camera auto-exposure behave, so the image stays consistent across multiple calls.
- Keep the setup simple and repeatable.
- Use the same placement each time for reliable lighting.
- Small tweaks beat expensive gear for everyday results.
How to minimize glare on glasses and harsh shadows
Small positioning changes stop reflections and smooth harsh shadows quickly. Glare happens when your lenses send a direct reflection back into the camera. That reflection hides your eyes and weakens connection.
Off-center placement
Move your key light about 20–30 degrees off the camera axis to the side. This shifts the reflection away from the lens so your eyes stay visible.
Raise the source
Place the light roughly 35–45 degrees above eye level. That angle makes reflections point down, not back, and also reduces deep shadows under the nose.
Fast micro-adjustments
Tilt your glasses slightly (about 5–10 degrees) during a test preview. Small inches and degrees usually solve glare faster than swapping gear.
- If one side is too dark: add a soft fill or bounce light off a nearby wall.
- Check your app settings only after physical changes are done; exposure tweaks won’t help if angles are wrong.
- Tip: repeat the preview and adjust until the face looks natural and shadows are even.
Best lights and gear for a clean, professional setup
Good lighting gear can be compact, affordable, and repeatable for everyday use. Choose equipment that matches your desk size and how polished you want to appear on-screen.
Ring light advantages
Ring lights wrap light around your face and reduce harsh shadows. Many include adjustable brightness and color so you can match room tones.
They are simple to position near your camera and make skin tones read more evenly. For small setups, a ring is often the fastest way to raise perceived quality.
LED panel options for small desks
LED panels are thin and easy to mount on a monitor or a small stand. They give directional control and usually offer color temperature settings.
Panels run cool, so diffusion is easier and safer. Use one as key and lower the output for a natural look.
Budget desk lamp setups
If you want a low-cost route, use a steady desk lamp as your key and add a dimmer or a second lamp as fill. Angle the lamp slightly off-axis to avoid glare on glasses.
Diffusion and safety tips
- Softening: place semi-transparent fabric or diffuser material between the source and you to smooth shadows.
- Distance: keep DIY diffusers about two feet from hot bulbs; LEDs can sit closer because they run cooler.
- Test: always preview in your actual platform to see how its processing affects the final result.
Advanced tips for better quality in real-world conditions
Practical strategies let you control color and brightness across homes, hotels, and outdoors. Use adjustable LEDs to tune color temperature from about 2700K to 6500K so different tones render naturally. Start near 5000K, then shift warmer or cooler in small steps until your skin looks true in the preview.
Reduce fatigue on long sessions
Lower brightness to about 300–500 lumens for long calls and balance multiple sources so you’re not staring into one harsh light. Softer settings cut eye strain and keep tones steady across hours of work.
Improve low-bandwidth performance
Even, front-lit faces reduce compression noise. When your face is uniformly lit, conferencing apps compress less, which improves perceived video quality and cuts pixelation on slow links.
Portable solutions and background depth
- For travel, use clip-on lights, compact LED panels, or small ring lights for quick setup.
- Add a subtle background source (~200–400 lumens) to separate yourself from the wall; if you use RGB, keep saturation low for a professional look.
- In outdoor or odd spaces, favor open shade, use a diffuser, and bring battery LEDs around 500–800 lumens to fill shadows.
Finally, standardize your go-to settings (Kelvin + brightness) so you can repeat the same tones and quality across rooms, devices, and conferencing platforms. That simple habit saves setup time and keeps your on-screen presence consistent.
Conclusion
Finish by locking in one reliable setup you can recreate fast.
Keep the simplest winning layout: a strong key light near the camera, a softer fill if you have it, and an optional back or background source for separation.
Target about 600–800 lumens for the key, set it roughly 45 degrees off axis and a bit above eye level, and aim near 5000K for a natural look.
Choose between natural light and controlled artificial lighting based on consistency. Placement beats expensive gear; small angle or height tweaks usually fix glare and harsh shadows.
Before each meeting, open your preview and do a ten-second check to make sure your face is evenly lit. Pick one room, note your best settings, and change only one variable as you improve.