Keeping your desk clear means fewer items on the desktop, faster setup, and fewer snags from loose cable runs. Define what “desk-clear” looks like for your space so you can make simple, practical choices that match your routine.
This guide is a buyer’s guide for audio storage and related setup decisions. You’ll learn what to buy, where it goes, and why each selection matters for your needs. Expect clear comparisons of desktop organizers, wall mounts, racks, rack drawers, and furniture-style cabinets.
We cover common setups: home office calls, streaming rigs, and small home studio recording. You’ll see how to match products to your space, equipment list, and budget, plus notes on road-ready rack cases, rack formats, and modular wood cabinetry for living areas.
What “desk-clear” audio organization looks like in a home studio or office
A smart reset routine keeps the top of your desk open while your most-used items stay within reach.

Reduce visual clutter without slowing setup time
Keep a simple quick-reset desktop so the surface stays usable for work and streaming. Use one small organizer for adapters, clips, and loose items rather than scattering them across the top.
- Quick grab zone: headset hook and mic arm within reach.
- Stash zone: drawer or cabinet for less-used items.
- Clear surface: open space for notes, laptop, or mixing.
Protect sound tools from drops, dust, and cable strain
Place mics on stable mounts and route the cable to avoid sharp bends at connectors. That reduces wear and keeps dust from settling on capsules.
Proper placement prevents falls and extends the life of your equipment while keeping repairs and downtime to a minimum.
Make daily access easy for calls, streaming, and music
After a session, hang your headset, park the mic on its base, and tuck the cable along a guide so you can start the next call without wasting time.
Intentional wall and desktop solutions also tidy your on-camera backdrop and match your room decor and design. Zones for grab vs. stash keep daily items reachable and less-used pieces out of sight.
Choose storage based on your gear collection and space
Start by listing what you use most so storage choices match how you actually work. A quick inventory keeps decisions practical and prevents buying solutions that don’t fit your room or routine.

Headsets, microphones, and accessories you need to store
Count headsets, microphones, stands, and the small accessories you touch weekly. Note which items live on the desk and which can be stashed.
- Inventory tip: log how many headsets and mics you use, plus stands and small adapters.
- Volume matters: a single USB mic needs less room than multiple mics plus an interface and headphones.
How much wall, shelf, and drawer space you actually have
Measure usable wall area, shelf height, and drawer depth. Don’t assume “it should fit” — check clearances for mounts and cable runs.
Account for cables and hardware like clips and mounts so they don’t become clutter. If your collection will grow soon, pick expandable solutions that balance open shelves (faster access) with closed drawers (cleaner look).
Audio gear storage that keeps your workflow fast
Design a fast-access zone beside your monitor so the items you use every session are always within reach. Small, deliberate placement saves you minutes each day and keeps setups frictionless.
Quick-grab zones vs. long-term zones
Create a quick-grab zone for your headset and main mic on a hook or short stand. Keep cables coiled nearby so you can start in seconds.
Place backups and rarely used items in long-term cabinets or drawers. This separation reduces clutter and protects less-used pieces until you need them.
Open shelving compared with doors and cabinets
Open shelving gives faster access and shows what you have at a glance.
Closed cabinets or doors hide clutter and cut dust. If a door requires too many moves to open, you’ll avoid using it—so choose a style that fits your routine.
When display storage suits your decor
If your pieces match the room decor, use display shelving to make them part of the design. A tidy display can motivate use while staying organized.
- Fast access: keep daily items visible and reachable.
- Long-term: store spares in a cabinet with labeled shelves.
- Choice: buy storage that fits how you work, not an ideal setup.
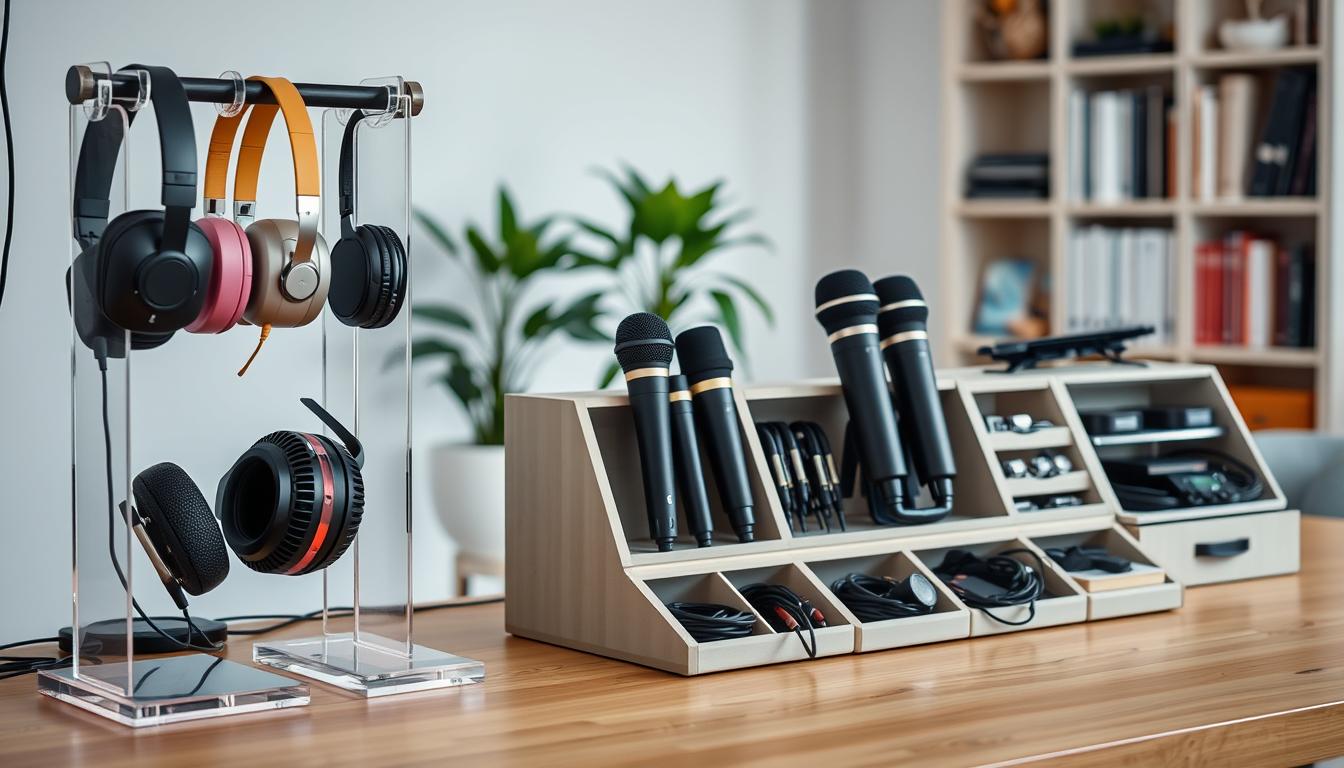
Desktop and under-desk storage solutions for everyday use
Clear the top of your desk by deciding what you need each day and what can sit below. Use small organizers on the desktop for the things you grab often. Put bulkier items and spares under the desk so the surface stays free for work.
Small shelves and organizers for mics, adapters, and small items
Keep a single shelf or tray for adapters, clips, and small items so they don’t scatter. Pick organizers with divided compartments so you can group similar pieces by type and size.
Drawer-based storage to hide cables and hardware
A shallow drawer is ideal for coils of cable, chargers, and mounting hardware. Use labeled dividers to separate cable lengths and connector types for faster retrieval.
Keeping frequently used gear within arm’s reach
Follow an “arm’s reach” rule: daily items should require one reach and one motion. That reduces friction and keeps your routine fast.
- Desktop vs under-desk: daily items on top; bulk and backups below.
- Buying selection: non-slip bases, divided compartments, and enough depth for bulky adapters and mounts.
- Space planning: place under-desk drawers where they won’t hit knees or block chair movement.
Wall storage to free up desk space
Use vertical wall space to free up your desktop for work and on-camera presence. Wall solutions move headsets and cable loops off the surface so your desk stays clear and usable.
Wall-mounted options that clear your desktop
Hooks are simple and low-cost. They hold headsets and short cable loops within reach and are quick to install.
Small wall shelves add a ledge for mic stands, adapters, and small equipment while keeping items visible.
Dedicated holders (angled rests or arrested cups) keep items stable and positioned where you naturally reach.
Placement and cable handling tips
Mount near the desk edge for fast access, but place mounts outside your camera frame if you want a clean backdrop. That keeps your decor and design tidy on video.
Route cables along a dedicated path. Use clips or a channel so heavy coils don’t hang on connectors and stress ports.
- Wall type: secure mounts to studs or use rated drywall anchors to avoid damage and ensure your equipment stays put.
- Protection: hanging prevents accidental knocks, reduces drops, and helps preserve delicate sound components.
- Design balance: pick finishes that match your room so the solution blends with home decor while improving access.
Rack cases for audio equipment when you need road-ready protection
A purpose-built rack case turns a pile of boxes into a system you can wheel, mount, and trust. For touring or frequent moves, a case protects connections and speeds setup so you spend less time at load‑in.
What a “space” (RU) means and common sizes
A rack “space” or RU is one unit of height for 19-inch mounting hardware. Count spaces so you don’t under-buy and run out of room.
- 4–6 spaces: small interfaces, power supplies, compact preamps.
- 8–12 spaces: typical for multi-unit setups; Seismic Audio lists 8-space models with extra bracing and 24 bolts.
- 16 spaces: fits full live or PA-style rigs and larger systems.
Construction, doors, and mobility
Construction matters for transport. Choose aluminum rails for mounting, steel bolts and L-brackets for strength, and black plywood or wood shells for impact resistance.
Removable front and rear doors make access quick during setup and teardown. Decide on casters for mobility or a stationary case for fixed installs. Casters help when you gig; a fixed rack reduces unwanted movement and vibration.
Price reflects protection: spend a bit more and save time and repair costs if you travel often.
Rolling racks, wall racks, desktop racks, and other rack formats
Pick a rack format that matches how you move and use your room, not the catalog picture. Different formats solve different needs: mobility, tight floor plans, or compact desks.
Rolling, tilt-out, and floor options for flexible layouts
Rolling racks give you mobility for reconfigurable rooms and live setups. Choose heavy-duty casters when your equipment weight is high.
Tilt-out and floor racks suit service access. A tilt-out front saves space while letting you reach the back of a unit quickly.
Wall and ceiling racks for tight spaces
Wall racks free floor space and work well where clearance is limited. Ceiling racks are rarer but useful above workbenches or band areas where floor use is critical.
Desktop racks for compact setups
Desktop racks keep short cable runs and quick access from your chair. They fit small systems and are ideal when you need immediate control over a unit.
Match the format to your room, equipment, and access needs
- Choice: base your selection on equipment depth and weight, not just unit count.
- Access: pick formats that let you service connections without heavy teardown.
- Design: decide if the rack should blend in or be a visible part of the room.
- Unit planning: plan for future units so you avoid swapping racks later.
Rack accessories that improve storage and protection
Think of rack extras as insurance: they secure mounts, manage power, and improve visibility.
Rack shelves, rails, and hardware for solid mounting
Shelves, rack rails, and quality rack hardware stop heavy units from sagging and cut vibration. Fit fixed shelves for odd-depth items and sliding rails for heavy processors so you can service them without removing the unit.
Doors for a cleaner front panel
Install vented or solid doors to protect knobs and switches from accidental bumps. A door creates a neater front panel and reduces dust while keeping the look tidy on camera or in shared spaces.
Wheels, casters, and mobility
Add locking casters to move the rack when needed and lock it during use. Non-locking wheels can shift under load, so pick heavy-duty casters rated for your total weight.
Lighting and cooling
Rack lighting makes troubleshooting fast in dim setups. Low-profile LED strips or puck lights shine on front panels without heat.
Rack fans keep stacked components cool. Use inline fans or rack-mounted units to force airflow and protect power-hungry devices from heat buildup.
Power accessories for clean distribution
Use rack power accessories like vertical PDUs and surge-protected strips to centralize outlets. That makes cable routing neat, reduces trip hazards, and keeps power organized for faster service.
- Mount security: rails and bolts that match unit depth prevent stress on connectors.
- Front protection: doors shield controls and tidy the front panel.
- Mobility: locking casters for stability during use.
- Serviceability: lighting and sliding shelves speed maintenance.
Use rack drawers to organize microphones, cables, and small gear
Rack drawers convert scattered pouches and loose cords into a single, reliable access point. Use one or two drawers to keep small items sorted and ready so you stop digging through bags at load‑in.
Lockable steel rack drawers for secure storage
Seismic Audio notes rack case drawers with steel construction and a lock for added safety. That steel shell resists travel bumps and protects microphones and adapters when you share space or on the road.
Choosing 2-space vs. 4-space drawers based on what you store
Pick a 2-space drawer for frequent‑use items and quick access. A 4-space drawer fits bulkier collections and spares.
If you carry many microphones or multiple long cables, choose 4 spaces. For mostly testers, adapters, and a few XLRs, 2 spaces keeps things compact.
What to put inside: XLR cables, patch cables, testers, and adapters
- Packing list: XLR cables, patch cables, cable testers, adapters, spare clips, and minor hardware in labeled pouches.
- Use Velcro wraps; avoid tight bends in cable runs to extend life.
- Separate power leads from signal cable where possible to reduce interference.
- One drawer pull replaces digging through bags, speeding setup and teardown.
Furniture-style cabinets for audio gear storage in living spaces
A well-crafted cabinet turns equipment into furniture so your living room stays inviting.
When your setup lives in a shared room, a furniture-style cabinet hides function behind a warm, finished face. Artisan pieces made from locally sourced American hardwoods blend with your home decor and feel like true furniture instead of a rack.
Solid wood cabinets that blend into your decor
Solid wood cabinets resist dents and add a tactile quality that metal racks lack. They match shelves, tables, and other finishes so your equipment looks intentional.
Pocket doors to hide gear fast and keep a clean look
Pocket doors are a “clean instantly” feature: open them for use, then slide closed to remove clutter from view. They keep cables and front panels out of sight without extra steps.
Adjustable shelves for vinyl, stereo equipment, and microphones
Adjustable shelf heights handle records, receivers, and handheld mics. Confirm shelf weight ratings and ventilation for amps or receivers before you buy.
- Buying tip: check ventilation cutouts or specify vents when ordering.
- Design option: glass fronts or built-in cutouts offer display-forward looks without exposing everything.
- Practical: ask about removable panels and cable channels for service access.
Modular storage systems that scale as your gear grows
Pick a cabinet footprint that fits today and leaves room for what you’ll add next year. Start with the size that matches your current collection and one planned upgrade, not an optimistic ten-year forecast.
Choosing small, medium, or large cabinet sizes
Small (35″ W x 36″ T x 21.5″ D) fits compact setups and modest collections. It works well if you mostly store microphones and a small interface.
Medium (51″ W x 36″ T x 21.5″ D) gives room for additional racks, a record shelf, or a small amp. This size balances footprint and capacity in a typical room.
Large (69″ W x 36″ T x 21.5″ D) suits bigger collections and multi-use living spaces. The 21.5″ depth handles larger components without blocking airflow.
When modular add-ons beat replacing the whole piece
- Modular wins: add drawers, trays, or shelves to expand capacity while keeping your main cabinet.
- Check stock vs. custom early—finishes and lead times vary by model and wood choice.
- Keep a simple “gear list” page so you buy the right sizes and avoid repeat purchases.
- Variety in configuration supports different needs, from records + stereo to microphones + accessories.
Built-in power and cable management features to prioritize
A well-designed power bay makes turning on amps and peripherals as simple as opening a door and flipping a switch.
Integrated power supply options for amps and powered gear
Integrated power removes wall-warts and exposed strips. That reduces clutter and speeds daily startup.
Built-in outlets often include surge protection and labeled circuits so your amps and other equipment stay safe and organized.
Cable routing to reduce clutter and improve access
Prioritize dedicated pass-throughs, strain relief points, and separate runs for power and audio cables to cut interference and wear.
- Pass-throughs: place them near device locations for short runs.
- Strain relief: use grommets or clamps at exit points.
- Separation: keep power lines apart from signal lines where possible.
Design for access so you can reach switches and trace a cable without removing the whole setup. If you can’t trace an end-to-end cable in under a minute, redesign the routing.
Why it matters: spending on smart cable management saves replacement cables and troubleshooting time. Choose features that match your needs and room design for faster, cleaner setups.
Materials, construction, and durability: wood, steel, and hardware
Choose materials that match how you use the case—tough steel where travel is common, and warm wood where the piece lives in plain view. Your choice affects protection, longevity, and how the unit fits into room design.
Steel construction and locks for security and transport
For frequent moves, pick a heavy-duty steel rack or drawer with reliable locks. Seismic Audio emphasizes aluminum rails with bolts and plywood shells; paired steel drawers give extra crush resistance.
Hardwood cabinetry for heirloom-style rooms and studios
If the piece lives in a shared room, artisan hardwood cabinets age well and look intentional. Sound Habitat‑style builds use American wood for lasting finishes and a furniture-grade feel.
Why rails, bolts, and build quality affect long-term value
Small parts matter: hinges, slides, latches, and other hardware determine whether doors and drawers stay smooth after years of use.
- Check rail alignment and rack bolt threads for snug mounting.
- Test door fit, drawer slide feel, and lock operation before buying a cabinet.
- Paying for quality reduces replacements and protects costly components, preserving long-term value.
Size, access, and door design for fast setup and clean storage
A clear plan for unit size and door style can shave minutes off every setup. Decide how often you’ll need panel controls versus deep maintenance before you pick a design.
Front-panel access vs. full-door access
Front-panel access lets you make quick adjustments—gain, mute, and power—without opening doors or moving equipment. That speeds daily use and keeps the front tidy.
Full-door access helps for cable swaps and servicing. Even if you want a clean look, a door that opens wide saves time during deeper work.
Removable doors vs. sliding/pocket doors
Removable doors are common on road units; they allow full access fast when you’re setting up. Sliding or pocket doors suit furniture-style pieces and hide components without extra clearance.
Planning shelf height and compartment depth
Measure your tallest unit, add clearance for connectors, and allow cable bend radius behind equipment.
- Size checklist: tallest unit, deepest connector, cable bend space.
- Shelf tip: adjustable shelves reduce regret when you swap items.
- Usable space: plan interior space, not just external dimensions.
Budget, price, and shipping considerations when you buy storage
When you buy a cabinet or rack, plan budget and delivery before you fall in love with the finish. That stops last-minute add-ons and keeps installation on schedule.
Balancing everyday price with protection and features
Start with must-haves: fit, access, and durability. Those items protect your equipment and reduce long-term repair costs.
Practical ladder: choose a model that fits, then add casters, locks, or built-in power if your budget allows.
Stock vs. made-to-order lead times for specialty cabinets
Stock units ship fast and often arrive in weeks. Made-to-order wood cabinets can take months, especially for custom finishes.
Plan project dates around lead times and confirm whether any items are held in stock before you commit.
Shipping and delivery realities for heavy racks and wood furniture
Racks and cabinets are heavy and bulky. Check delivery methods, liftgate needs, and assembly time before checkout.
- Compare selection: review size, weight rating, and accessory compatibility on the product page.
- Total delivered cost: add shipping, liftgate, and assembly to the list price so you compare apples to apples.
- Packaging and construction: confirm solid construction and good packaging to avoid damage in transit.
Conclusion
Decide on a simple system that fits your footprint, your most-used equipment, and the speed of your daily routine.
Quick summary: choose by your available space, your equipment list, and how fast you need access. For many setups the best desk-clear mix is a small wall hook for headsets, hidden drawers for cables, and a rack or cabinet for core audio units.
Racks win when you need dense, standardized 19″ mounting and fast service access. Cabinets win when you want a living-room look, closed-door neatness, and furniture-style design.
Plan for growth with modular sizes and add-ons. Prioritize integrated power and disciplined cable routing to cut troubleshooting time.
Before you buy: measure the spot, confirm unit dimensions and construction quality, check stock and delivery. Then pick wall, rack, drawers, or cabinet, compare products by access and features, and commit to a system you’ll maintain.