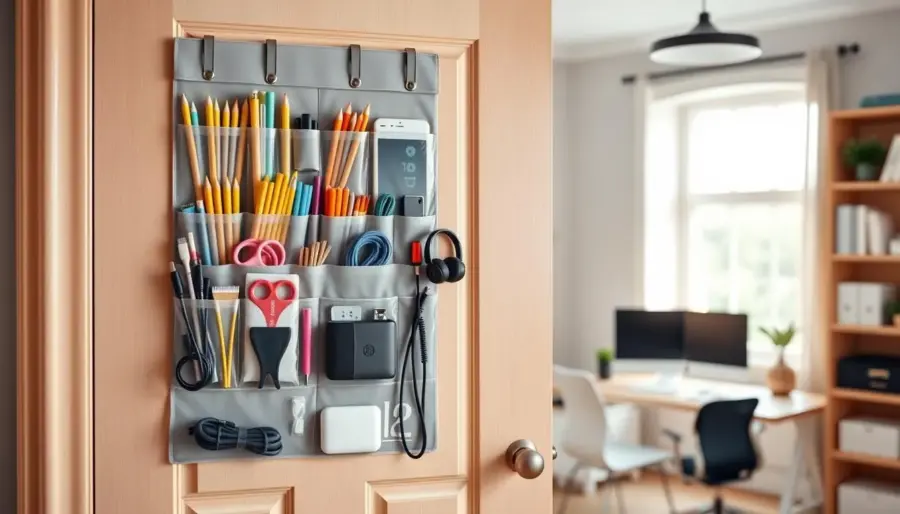
Turn unused door backs into smart, vertical storage that keeps your daily tech and office gear within reach and off the desk. This approach lets you add capacity without stealing floor area, so your room stays open and uncluttered.
By “Door-back organization” we mean converting a single door into a tidy vertical unit for chargers, cables, pens, and small peripherals. You’ll learn how different organizer styles — pockets, baskets, hooks, pegboards, and stick-on bins — fit various needs and weights.
Why a door works like a free wall: it uses large, underused surface area so you don’t need another shelf or cabinet. Measuring clearance and choosing the right hanging method are key to success.
Throughout this roundup, you’ll compare fit, weight capacity, and daily use. Expect quick wins: a grab-and-go charging station, a mail command center, and modular storage for adapters. Keep in mind what you store, where the door sits, and how heavy the load will be.
Why doors are your most overlooked storage “wall” for tech and office gear
Think of your door as a ready vertical wall you already own. It gives high-impact storage without changing the room layout. That makes it a smart choice when you need more space but not more furniture.

Behind-the-door storage keeps cables, chargers, and papers off your desk while still within arm’s reach. You stop rifling through drawers and find items faster. Desktop clutter falls, and visual noise goes with it.
- Use the back of a home office door for daily tech and a grab-and-go station.
- Mount an organizer on a closet door for overflow supplies and to stage tomorrow’s bag.
- Place a compact rack on an entryway door for keys, sunglasses, and mail.
- Attach file holders to cabinet doors for checklists, schedules, and emergency contacts.
This approach supports simple routines: hang headphones, drop a lanyard, and return items to the same pocket after meetings. For renters and small-space living, door storage is a practical upgrade that adds useful space without a single new shelf.
Measure first so your door organizer actually fits and the door still closes
Start by measuring key gaps so your new door organizer fits without blocking the latch.

Check clearance at the door closure, top jamb, and floor before you buy
Measure the closure side where the latch meets the frame, the top jamb clearance, and the gap to the floor. These three checks stop scraping, binding, or a door that won’t latch.
Plan around knobs, hinges, and trim so hanging storage doesn’t snag
Account for knobs, lever handles, and hinge barrels. Pick hangers and hooks that clear trim and won’t catch when you swing the door open quickly.
Choose slim profiles for tight spaces like closets and cabinet door setups
In narrow closet runs or the inside of a cabinet door, favor slim, low-profile systems to save space and keep the door functional.
- Depth budget: shallow pockets for cables and adapters; deeper racks only for lightweight bulk.
- Shared doors checklist: quiet movement, no sharp hooks at face level, nothing that swings into walkways.
- Measure first: avoids returns and ensures the storage upgrade works day-to-day.
Mounting methods that won’t wreck your door
Mounting the right way keeps your door intact while adding useful storage for tech and office gear. Pick a method that holds your items and lets the door close without scraping or binding.
Know your door before you drill
Tap near the edge to hear a hollow sound or look at the edge of the door. Hollow-core doors are lightweight and can collapse if you drive screws straight through. Solid or slab doors accept fasteners better and tolerate small mounts.
Over-the-door vs adhesive mounting
Over-the-door hooks and frames support heavier loads and are removable. Adhesive mounts leave no hardware holes and work well on cabinet doors or renter-friendly setups, but they have lower weight limits.
- Weight: over-the-door > adhesive for heavy or frequently handled items.
- Removability: adhesives are cleaner to remove; hooks can be shifted easily.
- Flush close: thin hangers keep the door closing smoothly.
When to use tiny screws or adhesive tacks
Use a very slim screw for light, low-torque loads like a clear plastic magazine holder. For renters or cabinet door interiors, adhesive tacks are better. Always clean the surface, allow proper curing time, and place mounts where door movement won’t shear the bond.
Match the mounting method to what you store: tech accessories are dense yet light, so choose a stable, wobble-free solution. In the rest of the roundup, each product will note compatibility: over-door, adhesive, or minimal fasteners.
Door-back organization for tech and office supplies you need every day
Convert unused door space into a compact, labeled setup that holds the tech and papers you grab every morning. This makes routines faster and keeps counters clear.
Build a grab-and-go station for chargers, headphones, and batteries
Top zone: hang headphones and lanyards where they are easy to reach.
Middle zone: place a small pouch or clear holder for chargers, power banks, and a multiport cable.
Lower zone: reserve low pockets for spare batteries, travel pouches, and bulky adapters so weight is lower on the door.
Create a family command center with pockets for mail and school papers
Use a pocket-style organizer to give incoming mail, permission slips, and forms a home instead of a countertop pile. Label each pocket by person or purpose to speed mornings.
Keep one clear “outgoing” pocket so items ready to leave the house are visible and not forgotten.
Use clear compartments so you can see cables and spare parts at a glance
Clear-front holders and small bins reduce duplicate purchases by showing you what you already have.
Separate personal chargers from household cables to avoid morning mix-ups. Return things to the same pocket and do a five-minute weekly reset.
- Choose an organizer that matches pocket size and stays stable during use.
- Prefer visibility—clear holders help you take stock quickly.
- Limit a single misc pocket to avoid silent clutter growth.
Over-the-door pocket organizers that work beyond shoe storage
A simple over-the-door pocket grid can turn shoe storage into a tidy depot for pens, cables, and small tools. This is one of the fastest ways to add hanging storage without building shelves.
Use pocket labels to keep markers, scissors, and tools sorted
Label each pocket so you and others know where things go. When pockets have names, you reduce decision fatigue and return items faster.
Try removable labels or a label maker so you can retag pockets as needs change.
Right-size pockets for flash drives, dongles, and small peripherals
Assign shallow pockets for flash drives, dongles, and short cables. Medium pockets suit chargers and power banks.
Reserve deeper pockets for small notebooks, padded mailers, or a compact tech pouch. Keep heavy items low to avoid pull-forward wear.
Best placements for office doors vs closet doors vs pantry-style doors
Place these hangers on office doors for daily-access tech and grab-and-go gear.
Use them on closet doors for backstock like shipping supplies and spare paper.
On a pantry or door pantry, store shared household items you restock often.
- Safety tip: don’t overload the top row; secure sharp tools in lidded pockets if kids can reach.
- Specs to look for: reinforced seams, breathable mesh or clear pockets, and padded over-door hooks that won’t scratch.
- Quick win: assign color or icon labels for each family member to speed mornings.
Wire basket door storage rack systems for bulkier office supplies
When bulk supplies start overflowing drawers, a hanging wire rack on the door brings order back fast. These systems give you a low-cost way to add several shallow shelves without buying a new cabinet.
Why a wire basket rack works: the open design holds bulky items—padded envelopes, label rolls, small boxes—while letting you see stock levels at a glance. Wire racks are airy, durable, and resist dust build-up.
Multi-compartment baskets for pack, ship, and returns
Pick a multi-compartment design so you can separate zones for “pack,” “ship,” and “returns.” One basket holds mailers, another tapes, and a third stores labels or bulk forms.
How adjustable baskets handle mixed sizes
Adjustable shelf rod systems let you slide or swap baskets to fit notebooks, tech cases, or taller mailers. Use one deep basket for planners and a shallow one for tape rolls.
- Real-life tip: place clips, tags, and scissors inside clear jars within a basket so small items don’t get lost.
- Check basket depth vs door clearance and hook stability before buying.
- Confirm the rack won’t collide with the handle side when the door closes.
Bottom line: wire racks give flexible, high-capacity storage that behaves like a movable shelf system. For bulkier office goods, they often deliver the best value without a full shelving unit.
Adjustable rod + hook systems for flexible hanging storage
Adjustable rod systems turn a plain door into a flexible hanging wall that adapts as your gear changes. These rails fit tight clearances and let you reposition hooks, baskets, or small trays without permanent mounts.
Why adjustable rods work when needs change
Think of the rod as a mini wall you can reconfigure. Slide hooks left or right, add a second rod, or swap components as your routine shifts.
Sturdy hooks for headphones, lanyards, and tote bags
Use rounded hooks for headsets to protect padding, wider hooks for lanyards and badges, and heavy-duty metal hooks for reusable tote bags or a slim laptop sleeve.
How to avoid door-slam rattle and shifting loads
Hanging items can clank when the door closes. Add small Velcro strips or soft bumpers where components touch the door to muffle noise.
- Stability plan: keep heavier items centered, spread weight across multiple hooks, and stack vertically rather than crowding one hook.
- Practical tip: reserve a lower hook for a towel or quick-clean rag in craft or print stations.
- Flexible pick: choose adjustable rods when you want versatile hanging storage without fixed shelves or big installs.
Metal and steel door organizers for heavy-duty setups
Heavy items demand a sturdier approach — that’s where steel racks and metal hangers pay off. Use metal when weight capacity matters and you need long-lived, stable mounting that won’t flex under repeated use.
When to choose metal or steel hanging systems
Step up to a metal door solution if you hang tool kits, label makers, multiple power strips, or dense cable bundles. Thin fabric pockets and plastic hooks sag with time; metal holds shape.
Buying criteria for a durable rack
- Construction: prefer welded joints and thicker gauge metal over thin wire frames.
- Finish: look for powder-coating or plating to resist scratches and rust.
- Hook design: rounded, reinforced hooks that don’t bend under load.
- Mount type: solid-door mounts or dedicated steel hanging hardware for minimal flex.
Best uses and safety tips
Assign a “repair and maintenance” door for tools and batteries, or a “shipping” door for tape, boxed supplies, and bulk power strips.
Keep the heaviest items below shoulder height, confirm the door swings freely, and avoid installing heavy racks on hollow-core doors. Higher cost buys you durability and higher load limits — a practical tradeoff for frequent use.
Tiered racks and “spice rack” style organizers—repurposed for office storage
A tall tiered rack can turn a narrow door into a compact parts shelf that keeps small tech items visible and sorted.
These hanging spice rack and tier systems work well for tech because they separate many small items into shallow, visible shelves. You can spot a USB hub or adapter at a glance and grab it without digging.
How to lay out tiers for office tech
Try one shelf for USB hubs, one for batteries, one for SD cards and small boxes, and another for daily adapters.
Stack heavier items low and frequently used items at eye level so access is fast and safe.
When a 6-tier door pantry is the right scale
If you manage camera accessories, spare peripherals, or shipping supplies, a 6-tier door pantry gives the capacity you need without adding furniture.
- Fit guidance: check tier depth vs door clearance and pick a shelf lip tall enough to hold items during movement.
- Anchoring: use a tall adjustable rod or secure hooks to prevent tilt on thin doors.
- Product notes: you’ll compare true spice rack designs, pantry organizer formats, materials, and adjustability in the product roundup.
Clear file holders and document organizers for door-mounted paperwork
Use transparent holders on a door to turn loose paperwork into a quick visual workflow. Mounting clear file holders replaces paper piles with visible slots so you stop missing tasks and deadlines.
Keep frequently used papers in plain view
Put a holder for current bills, a holder for urgent school forms, and one for active projects. Label each pocket to mirror your calendar names so you file at a glance.
Sort by project with labeled bins and baskets
Combine clear folders with a small bin below for stamps, return labels, and pens. This makes each project self-contained and reduces desktop trips.
- Best spots: inside a cabinet door by the printer, on an office door near your desk, or a closet door that keeps supplies close.
- At-a-glance: like a note posted inside a kitchen cabinet, you can scan pending items in seconds.
- Buy tips: prefer rigid clear holders over mesh so papers don’t curl, and choose mounting that won’t damage the door surface.
Pegboard panels on doors for modular tech and craft-style organization
A pegboard panel lets you swap hooks and bins quickly so your setup adapts as your workflow changes. Add a small panel and you turn a door into a usable wall that grows with your needs.
Use metal or hardboard peg panels with a mix of pegboard hooks, small cups, and clip-on bins. Hooks hold cables and scissors, cups store pens and styluses, and shallow containers keep adapters tidy.
Layout tips to group by workflow
Arrange zones by task rather than only by item type. Create “charge,” “print/ship,” “repair,” and “create” bands so you move through steps without crossing zones.
Placement and safety
- Best spots: an office door for daily tools, a closet door for overflow, or a garage/utility door for repair gear.
- Keep long tools higher and secure; avoid sharp points at waist/shoulder level to prevent snags.
- Check hole-spacing compatibility, accessory quality, and whether the kit includes door-safe mounting hardware.
Quick evaluation: confirm peg spacing fits common hooks, test add-on container fit for small items, and choose a design that mounts without damaging the door surface.
Self-adhesive stick-on bins for small accessories and tight spaces
For cramped nooks, adhesive bins convert narrow door interiors into practical micro storage units. They work especially well inside a cabinet door where depth is limited and counters must stay clear.
Why choose stick-on bins: clear plastic bins keep items visible so you won’t lose adapters or SD cards. Adhesive mounting avoids drilling and fits rental-friendly cabinet interiors.
Divided compartments for tiny tech
Use divided trays for SD cards, spare earbuds, SIM tools, USB-C adapters, and small dongles. Dividers stop items from mixing and make inventory quick.
Placement and product options
Mount bins away from the cabinet frame so the door closes without striking them. Place frequently used bins at eye level to avoid crouching.
- Clear plastic bins for instant visibility.
- Opaque plastic bins for a cleaner look.
- Slide-top vs open-top: pick slide-top if you need dust protection; open-top for fastest access.
Maintenance tip: dedicate one bin as “incoming” for loose small items and sort it weekly. Clean the surface, allow adhesives to cure, and test the bond before loading heavy contents for reliable daily door storage.
Repurpose office supplies as door organizers to save money
With just a magazine holder and a couple of hardware-store finds, you can build useful door storage fast.
Use a transparent plastic magazine holder mounted on a pantry or cabinet door to store reusable bags, mail, or shipping labels. Mount it with a very slim screw into a solid section or with adhesive tacks for a renter-friendly option.
Turn simple hardware into tool and tape stations
A basic toilet paper holder becomes a neat rack for packing tape, washi, or label rolls. Add a small hook or a slim bar to hold scissors and a cutter nearby.
- Mounting: slim screw or adhesive tacks for light loads.
- Cost: low — you’re reusing items you likely already own or can buy cheaply at a hardware store.
- Durability: test the mount by opening and closing the door a few times before full loading.
Kitchen and pantry storage ideas cross over well—pantry-door solutions keep supplies off counters and within reach, making them ideal for shared work-kitchen zones.
Pair repurposed holders with a small dry-erase board for restock notes and quick to-dos so your setup supports action, not just storage.
Hooks, bars, and hangers for staging your day and protecting your gear
A few well-placed hooks and a short bar can turn a plain door into your daily launch pad for work. Use hooks and hanging bars to designate a spot for your bag, headset, or a full outfit so mornings run smoothly.
Over-the-door hooks to hang tomorrow’s work bag, headset, or an outfit
Over-the-door hooks create a simple wardrobe planning station. Hang a jacket, a bag, and an outfit together so you leave with everything in one sweep.
Choose wider hooks or padded contact points to protect straps and avoid creases. Don’t mount heavy bags on weak doors.
Add small hanging buckets for grab-and-go accessories
Pair hooks with a small hanging bucket for chargers, badges, lip balm, or transit cards. That keeps tiny items from falling into the abyss.
- Placement: mount on a closet door for clothing routines or an office door when you want gear near your desk.
- Complement: a shoe-organizer style system below the hooks holds chargers, socks, or shoe-care items that belong with your kit.
- Compare: single-hook vs multi-hook bars, removable vs permanent styles, and check load ratings before you buy.
Labeling and visibility upgrades that make door storage actually stay organized
Clear labels and a small note area turn extra pockets and racks into a system you use every day. When each pocket, basket, or shelf has a name, you stop guessing where things belong.
Simple label systems for pockets, baskets, and shelves
Use printable tags, label-maker tape, or looped paper tags on wire baskets for a tidy, consistent look.
Tip: attach labels at the front edge so they remain visible when you open the door.
“At-a-glance” planning with door-mounted notes, lists, and schedules
Mount a small whiteboard or a pocket for restock lists and weekly priorities. Keep common reminders—charging needs, meeting gear, or outgoing mail—right on the door for instant reference.
How to group storage by function to prevent re-cluttering
Group zones by task: “charging,” “meeting,” “shipping,” and “spares.” This functional approach borrows pantry organization storage logic: zones keep things from drifting into the wrong spot.
- Labels stop improvisation and speed returns.
- Use a 2-minute daily reset and a 10-minute weekly review.
- Update tags as your routine changes so the organizer and storage stay useful.
Conclusion
Transforming a door into extra storage gives you more capacity without adding a storage cabinet or changing room layout.
Measure clearance first, choose a door-safe mounting method, then match an organizer to your daily items and routines. Pick a shoe-pocket style for small supplies, wire rack systems for bulk, rods and hooks for flexible hanging, pegboard for modular tools, and stick-on bins for tight cabinet spaces.
Choose metal or steel options when weight and durability matter. Keep things visible with labels and functional zones so door storage stays useful, not hidden clutter.
Practical next step: pick one door, install one door organizer hanging storage solution, and set up a single “daily essentials” zone before expanding to other doors.