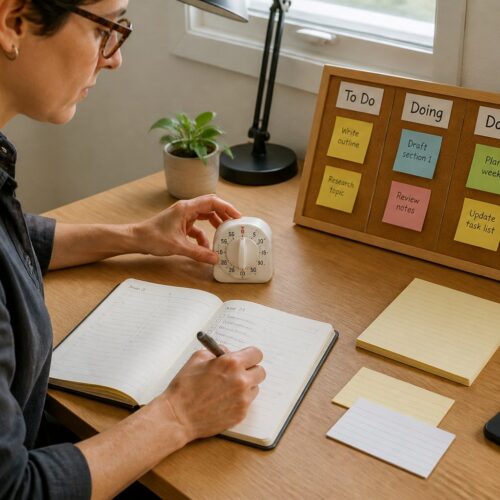
This short guide shows how to create extra shelf levels above your desk without drills. You’ll learn renter-friendly, tool-free methods that keep your hutch intact. The goal is stable shelves, better organization, and a cleaner workspace.
This is for renters, dorms, and small home offices. You’ll get clear steps that preserve ergonomics and safety. Expect tips on weight distribution, anti-tip planning, and keeping monitor and keyboard placement comfortable.
Key decisions you’ll preview include measuring first, choosing a shelf system that matches what you store, and picking indoor-friendly materials that are easy to clean. The article uses a “vertical garden” idea to keep items visible and avoid dark, cluttered corners.
By the end you should feel confident to try these simple changes. The result is a neater setup with a smarter look and a better working experience.
Why a Tiered Setup Works for Your Desk and Your Vertical Space
A stacked setup helps you reclaim wasted space above your desk without expanding your footprint. Think of the design like a small-scale vertical garden: levels let you place items where you can see and reach them, instead of piling everything on the surface.

Stacking levels frees the main workspace so your center desk stays clear. In a tight room, fewer items sprawling across the top makes the area feel larger and calmer.
- Stack up, not out: reuse unused vertical space to store daily essentials at eye or hand level.
- Better access: keep everyday items low and reference pieces higher so you don’t rummage through piles.
- Air and light flow: small gaps between levels reduce dust traps and avoid heavy shadows.
- Systems thinking: a repeatable method helps you sort, display, and find things fast.
These simple moves borrow lessons from gardens and adapt them for desktops. The result is neater, more functional storage that supports fast transitions between tasks.
Choose the Right Desktop Hutch and Tier System for Your Space
Begin with simple measurements to make sure any shelf system suits your workflow. Accurate sizing prevents awkward fits and unsafe overhangs.
Measure your desk area, depth, and usable height
Measure width, depth, and the usable height up to windows, shelves, or obstacles. Note where cords, outlets, and baseboards sit so nothing blocks everyday use.
Check wall clearance and top level height
Allow clearance from the wall for ventilation and cables; even freestanding units need a gap to sit flat. Define top level height as the highest shelf you can reach without standing or hitting lights or monitor arms.
- Match the system to what you store: books need rigid shelves; planters need spill protection and easy removal.
- Pick shelf depth to fit common containers and prevent overhang or tipping.
- Use a simple diy sketch and item list to avoid buying mismatched pieces.

Remember: if you must hold shelves without drills, the attachment style is your main constraint. Choose compatible tool-free hardware next.
Adding vertical tiers Without Drilling: Tool-Free Methods That Hold Securely
You can add secure, tool-free shelving above a hutch using a few simple product styles. Below are four practical approaches so you can pick the right solution for your space and load needs.
Modular stackable risers (container-stack approach) let you grow levels as needed. You add or reconfigure pieces, and some units include reservoirs or drainage for planters.
- Clamps and over-the-hutch hooks: Great for renters. Protect finished edges and confirm clamp depth before use.
- Freestanding tiered stands: Instant extra shelves that sit on top. Plan center-of-gravity carefully to avoid top-heavy loads.
- Adhesive or tension mounts: Best when a wall can share load. Verify surface type and rated weight for safe removal.
Stability planning rules: place heavier items low, use non-slip liners, and perform a push test to confirm nothing shifts. Metal frames are helpful in tight spaces because they are strong with thinner profiles, preserving usable shelf depth.
Quick checklist: make sure rated loads match your items, keep shelves away from monitor vents, and don’t block outlets or cable runs.
Tier Styles to Copy from Vertical Gardens (Adapted for Desktop Use)
Think like a gardener: the same layers that help plants thrive work for your desk items. Garden forms solve visibility, access, and airflow when you shrink them to fit your hutch.
Ladder-style steps for reach and a clean profile
Ladder-style setups use shallow steps that keep items reachable and reduce visual bulk. They pair well with monitors and task lights.
Pyramid-style stacks to protect lower levels
Pyramid layouts place smaller shelves up top so high items don’t block what’s below. This works well for books, boxes, and small displays.
Cascading shapes for a softer look
Cascading planters and shelves let trailing plants drape without overwhelming the desk. Use spill-resistant pots and trays for clean indoor use.
Wall-mounted “green wall” ideas behind the hutch
When allowed, mounted pockets or lightweight organizers free up horizontal surface area. Take care with load distribution and surface compatibility if you use adhesive or tension mounts.
- Styling tip: bottom = work-first, middle = reference, top = display.
- Practical note: keep heavier items low for stability and easy reach.
- Design idea: borrow irrigation or modular pockets from garden systems for neat maintenance.
Materials and Finishes That Matter Indoors
Pick finishes that balance durability, ease of cleaning, and a cohesive look for your desk.
Cedar-look and composite options give you the warm wood appearance without heavy upkeep. Cedar and redwood resist rot and insects, while composites mimic that grain and stay stable indoors.
Metal frames (including galvanized-style) offer high strength in a slim profile. Steel supports free up shelf depth and hold heavier items with less bulk. Galvanized finishes resist rust and suit modern or industrial decor.
Food-grade plastics are lightweight and wipe-clean. Recycled versions resist UV and warping, so you can move organizers easily and handle small spills without staining.
- What matters at a desk: weight, wipe-clean surfaces, scratch resistance, and how finishes look under office lighting.
- Soil-adjacent use: if you plan small planters, choose materials that tolerate moisture and won’t stain easily.
- Visual calm: pick one finish family—one metal tone or one wood tone—to keep the setup cohesive.
Quick tip: test shelf liners on your chosen finish to prevent slipping and avoid residue. This keeps both function and appearance clean over time.
Planning Your Layout: What Goes on Each Tier (Top to Bottom)
Plan each shelf like a stability-first pyramid: heavy items form the base and lighter pieces sit higher. This planning keeps the whole system steady and reduces wobble risk.
Heavier items low, lighter items high for stability
Place heavy containers and books on the lowest level so the base is solid. This lowers the center of gravity and prevents tipping.
Zone by frequency of use to reduce daily clutter
Keep daily essentials on the most reachable level. Put weekly items on a secondary shelf and store occasional pieces at the top.
Create micro-zones like a gardening system: supplies, display, daily essentials
Divide shelving into small zones inspired by garden systems. One zone holds supplies (tape, batteries), one holds display items, and one holds notebooks and pens.
- Workflow check: keep tools you grab mid-task within arm’s reach so you don’t break focus.
- Plan cable paths to avoid blocking ports or power strips when you stack items.
- Use small bins and quick labels to keep containers organized and visible over time.
Lighting, Airflow, and Room Conditions You Should Account For
Consider how shade and breeze interact across levels the same way gardeners plan sun and shade. That mindset helps you avoid dark lower shelves and stale corners in your hutch.
Prevent shadowing by spacing shelves like a garden canopy: allow gaps, use shallow shelf depth, and place taller décor at the sides so light reaches the center.
Use reflective or light finishes on lower shelves to brighten them. Keep task lighting clear of obstructions and avoid glossy surfaces that cause monitor glare.
- Airflow: Don’t pack the back tightly; leave channels for air to move and cut dust buildup.
- Materials: House humidity swings can warp cheap boards or loosen adhesives—pick stable finishes for growth-prone conditions.
- Seasonal care: In summer, avoid direct HVAC blasts; in winter watch dryness that raises dust and static.
Comfort check: Ensure vents stay clear and no hotspots form behind electronics. Small adjustments keep your setup clean, safe, and productive all season.
How to Add Planters to Your Desktop Tiers (Without Making a Mess)
Give your desk a fresh, green layer that stays neat and drip-free. Focus on leak control, stable bases, and quick removal for watering so your workspace stays dry and tidy.
Best plants that work on shelves
Pick drought-tolerant choices that behave well indoors. Good options include herbs like thyme or oregano, space-saving succulents, and a single trailing plant to soften edges.
Containers and soil tips to prevent leaks
Use closed-bottom cachepots with inner nursery pots or saucers so excess water never touches shelves. Protect surfaces with a removable liner or tray before you place containers.
- Use quality potting mix and avoid heavy garden soil.
- Top-dress with pebbles to reduce scatter during watering.
- Don’t overfill containers near the rim to keep soil from spilling.
Create a professional mini vertical garden look
Keep one or two planters per shelf and use a consistent color for containers for a calm, cohesive look. Stagger heights so nothing blocks your screen or crowds your workspace.
- Placement rule: keep plants away from keyboards, papers, and vents.
- Maintenance tip: put planters on an easy-clean surface or removable liner for quick swaps.
Watering and Spill Control for Tiered Desktop Planters
Keeping your desk dry means planning how you water each plant and where runoff goes. Small setups need clear routines so moisture stays in pots, not on shelves or electronics.
Why even watering across levels is tricky (and how to avoid drips)
Gravity pulls excess water downward, so lower pots may get soggy while top pots dry out faster. Inconsistent soil moisture invites root problems and spills.
Self-watering containers and low-maintenance reservoirs
Self-watering planters with built-in reservoirs reduce daily watering. They hold water below the soil so roots draw what they need, cutting runoff and the need to frequent watering.
Catch trays, liners, and a clean “top-down” routine
Use matching trays, waterproof liners, and absorbent mats under each shelf. Follow a top-down water routine: remove the planter, water over a sink until it drains, let it finish draining, then return it.
- Simple system tips: use the same container size and soil depth so moisture behaves predictably.
- Spill-control gear: trays sized to the pot footprint, shelf liners, and small drip mats work well.
- Quick check: finger-test soil—insert to the first knuckle; water only if dry there.
Make sure there’s no standing water near cords or electronics and that trays can catch overflow before you place plants on your desk.
Maintenance Routine: Keep Your Tier System Clean, Safe, and Good-Looking
A simple upkeep routine keeps your shelf system safe, tidy, and looking intentional. Regular care prevents small problems from becoming big failures and helps your plants stay healthy.
Weekly reset
Wipe shelves, clear crumbs, and declutter items so work zones stay usable. Prune plants to stop leaves from dropping and to improve airflow.
Use wipeable liners and matching bins so this step takes minutes, not an hour.
Monthly stability check
Do a quick safety review: tighten clamps, re-seat risers, and verify adhesives if you used them. Give a gentle load test to confirm nothing shifts when nudged.
Refresh cycles by season
Rotate containers and swap display items each season to even out sun exposure and wear. A seasonal refresh keeps the arrangement intentional and prevents uneven fading or soil wear.
- Simple routine: weekly reset, monthly stability check, seasonal refresh.
- House reality: dust, HVAC airflow, and daily movement loosen parts—small checks stop surprises.
- Less effort: consistent bins and liners save time and reduce spills, wobbles, or clutter creep.
Troubleshooting Common Problems with Tool-Free Tiers
Troubles with light, wobble, or water are usually signs the layout needs a small tweak. Use a systems mindset: fix the root cause, not just the symptom.
If the system wobbles: anchoring strategies and weight distribution
Step-by-step solution: re-check that the desk top is level. Move heavy items to the lowest shelf and widen the base where possible.
Add non-slip pads under feet and use a gentle backstop against a wall when the design allows contact without drilling. If wobble persists under normal loads, downsize the top level or switch to a sturdier stand or system.
If lower shelves feel dark or cramped: spacing and angle fixes
Increase shelf gaps, use shallower containers, or angle shelves like garden steps so light reaches the lower space. This improves access and stops the shelves from turning into clutter zones.
If you’re dealing with water issues: drainage, liners, and smarter watering
Use catch trays, waterproof liners, and larger saucers. Prefer self-watering pots to reduce runoff.
Change your watering routine: water over a sink, let pots drain fully, then return them. These steps stop repeat spills and protect electronics.
- Quick decision rules: test load, move weight down, add non-slip pads, or downsize the top solution.
- If the problem repeats, address layout, weight, or drainage — that is the long-term solution.
Budget, DIY, and Upgrade Paths (From Simple to Advanced)
Try a compact modular setup first so you can test balance and reach without overspending. Start small, confirm what works, then grow the solution as your needs change.
Start small with modular stacks
Begin with a single modular system and expand it only if you need more space. Modular container stacks protect your budget because you only buy what you need.
DIY options using reclaimed materials
You can build a clean, desk-safe diy shelf from reclaimed wood, metal brackets, or repurposed crates. Sand edges and seal surfaces so cables won’t snag and finishes stay tidy.
When to upgrade to premium materials
If you place heavier items, add planters, or notice wobble, move to composites or metal for long-term durability. Premium systems need less maintenance and keep alignment better over time.
- Budget ladder: test a small module, confirm layout, then expand.
- Cost vs maintenance: cheaper setups need more care; better systems stay aligned longer.
- Upgrade paths: swap risers, reinforce the frame, or standardize containers one change at a time.
Conclusion
One measured change today can make your workspace calmer and more useful. Measure your area, pick a stable stand or clamp shelf, and plan each level so daily items are easy to reach. Keep heavy items low and the top level light for safety.
Think of your desk as a small garden: structured layers protect light, airflow, and visibility so plants and gear both thrive. Use leak-resistant planters and matching containers for a neat, professional look.
Maintenance is the long-term win—do a quick weekly reset and a monthly stability check. Pick one small upgrade now, test it, and expand only after you confirm comfort and balance through the season.